Showing posts with label vegetables. Show all posts

Saturday, December 30, 2017

Garden Records and a Free Printable for You!

Every since we moved to this location, I have kept a hap-hazard garden diary.   It's in a spiral notebook and contains vegetable varieties, ornamentals planted, rainfall, bloom dates, etc.   
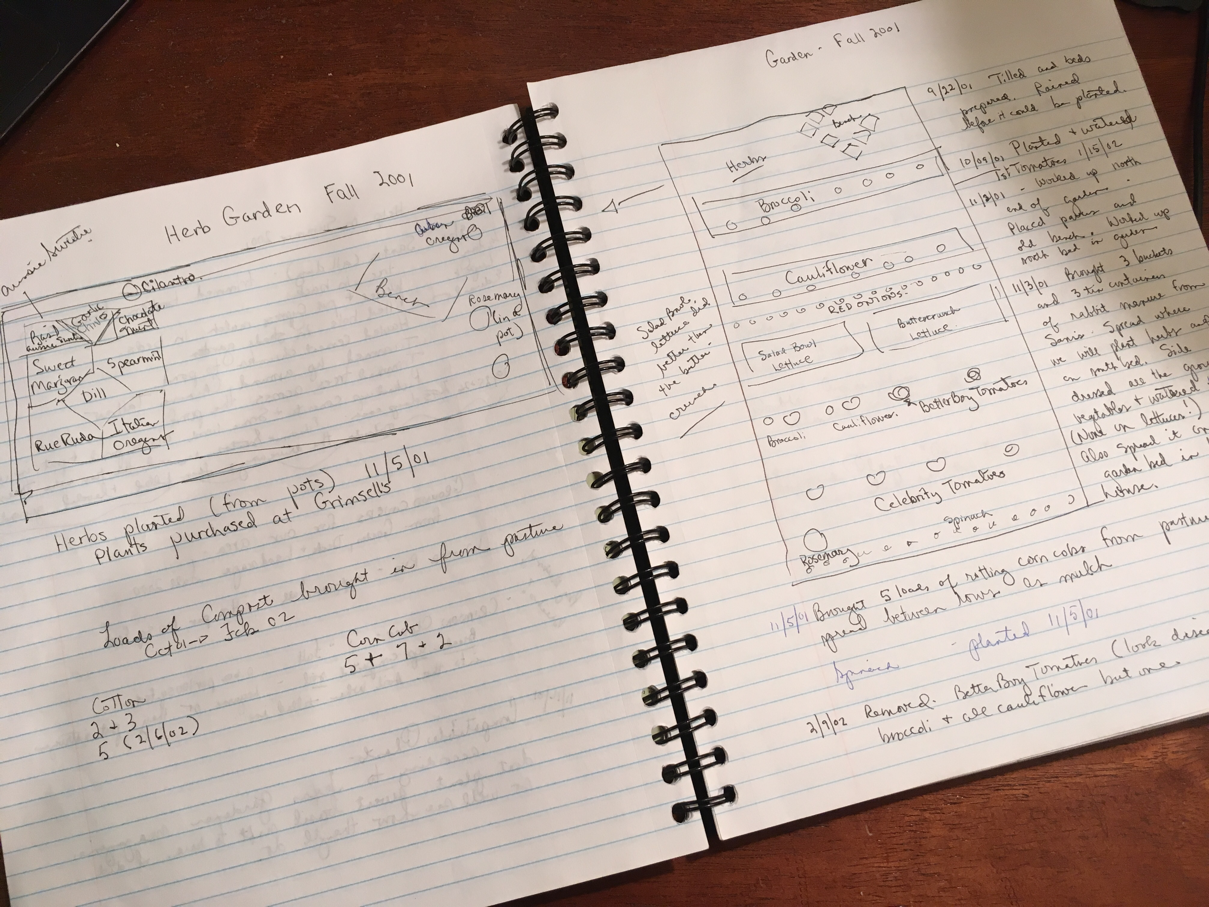
's
There’s a lot of info in there but I’m not sure how much constructive use it has.   This fall I read The Naturalist’s Notebook by Nathaniel Wheelwright and Bernd Heinrich.    It contains lots of information on how develop your inner-scientist.   

And it is beautifully illustrationed by one of the authors, Bernd Heinrich. 


The book includes a five year calendar to record observations - a format that could be handy in recording garden info.    In this time of unusual weather occurances and climate change, a multi-year record may help us see if our climate is really changing - and if it is, how quickly.    I expect that I will include info specific to our veggie/herb growing along with weather items like rainfall, frost, high temps, etc.    And I expect that I'll include some observations of birds and butterfly activity in our yard.   That's the initial plan anyhow.   We'll see what 2022 has me recording.     
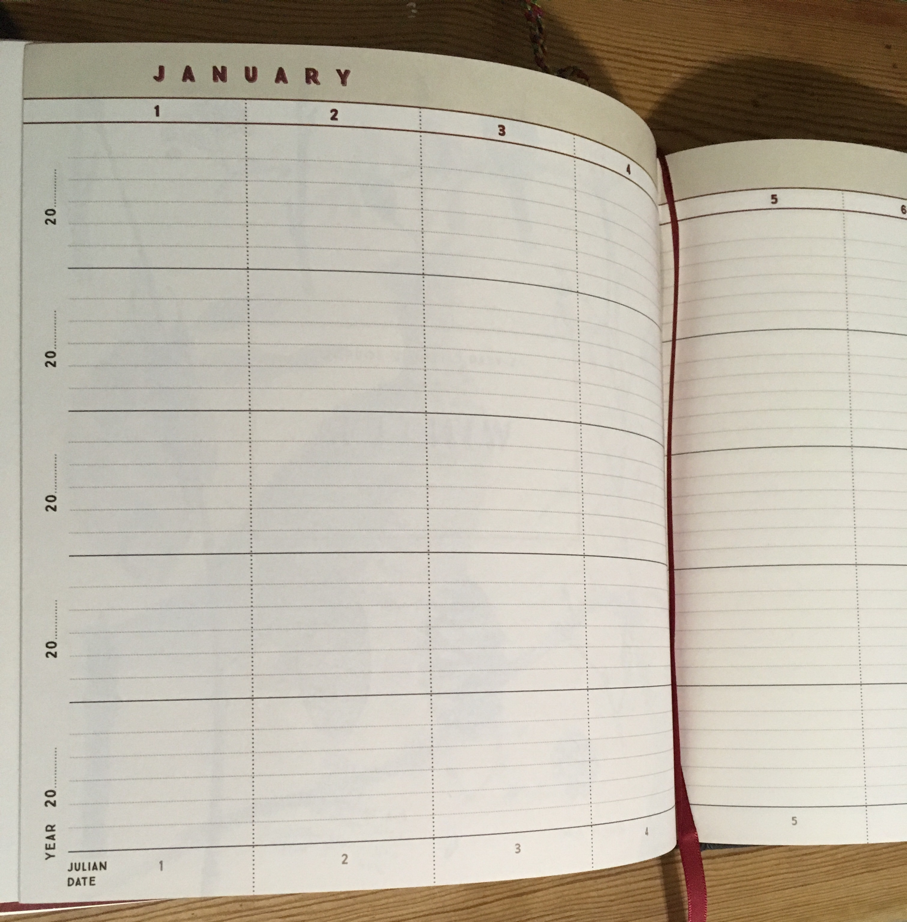

I'm so excited about this format that I've put together a free printable 5 Year Garden Calendar for you to use!    It was formatted to be printed front-and-back.   P
rint it on heavier copy paper so that the type doesn't show through.  I took mine to a printer to be spiral bound - but you can just punch holes and put it into a notebook.   I hope you give this a try - it should help make us better gardeners, better naturalists, and better citizen scientists! 

Thursday, May 25, 2017

Three Reasons To Retire My Tiller

 I can't tell you how long I researched and agonized over which roto-tiller to purchase.   And when I finally made the decision, I couldn't wait for it to arrive and to miraculously - and effortlessly) transform my heavy, hard to work, sticky, mucky clay soil into the perfect sandy loam. 
 
I chose this lovely little Mantis that I can handle easily on my own and envisioned using it for both prep and regular maintanence work. 

Here are my top three reasons for finally giving it away (although I retired it years ago) 
  1. You can't wrangle a tiller through clay soil.   Even with the perfect amount of moisture, clay particles are so small that they lay very close and tight up against each other.   This is what makes clays heavy and hard that work. 
  2. Tilling soil brings weed seed up to the surface where it will receive ample sun/heat to sprout - now there are more weeds to pull.    
  3. Tilling kills earthworms and other microorganisms by running over them (duh) or exposing them to light and air.   So in trying to help my soil, I was actually damaging it.  I discovered that if I mulched my planting beds with shredded leaves, earthworms and other bugs would break it down and move it through the soil more efficiently than I ever could.  Easy Peasy
I still don't have sandy loam (except in the raised beds we've built) but we've managed to grow a pretty nice landscape - and with much less effort. 
 

Thursday, March 16, 2017

Cabbage to Kraut

Since we grew a few cabbages this winter in our new raised beds, I decided to try my hands at making sauerkraut.   It was easier than I thought it would be so I'll post an addendum in a few weeks when it's done.   One cabbage makes two quarts so that was all I invested in this experiment - well, and a couple of Granny Smith apples. 

 
Step one is shredding the cabbage - nice and thinly.    Save a couple of the outer leaves to place on top in the jars. 


Now thinly slice the apples.   Any tart baking apple will do.    The directions didn't say this but I made some cross-cuts in the slices for smaller pieces.   


Put it all in a large bowl.  Add 3 tablespoons of fine sea salt and a teaspoon or two of caraway seed.  (The directions said I could add this now or later and I'm opting for later).   Let it sit for 30 minutes to an hour to get the juices flowing. 

Now it's time that  pack the jars.  Start with clean canning jars.   They don't have to be sterilized, just nice and clean.   I ran mine through the dishwasher.    The cabbage had not shrunk during its sitting so I couldn't imagine that it would fit into two jars.  Put a little in and using a tool, pack it forcefully.  I used the handle of my wooden lemon juicer.   It was a little short but did the job.   It will be moist and more liquid will form.   To keep the small bits of cabbage from floating to the top, place a part of a clean cabbage leaf on top and weigh it down. 

I used pie weights wrapped in cheese cloth as my weights.   

 
I'll taste it every week.  (And add some carraway seed).  When it's where I want it,  it will go into the refrigerator.   The cool will keep it at its present state for a year or more.   I think that is you live in a cool climate, it can be stored in a cool dry place too.  

Check back and I'll give you an update!  

Friday, January 6, 2017

January in the Garden

January a wonderful month in deep south Texas to spend time in your garden!  But when we get 80 degree days like earlier this week, we're tempted to jump the gun on some garden tasks.  Here's a guide for January Garden Tasks in our area.  


  • Gather and shred your fallen leaves.  They can easily be shredded with a mower or an inexpensive leaf shredder.   I have an electric leaf shredder, like the one pictured, that is indispensable this time of year.   The shredded leaves can then either be composted or used as mulch, where they will help suppress weed seed from sprouting and cool the soil during the summer. I have heard people say not to use live oak leaves because they contain too much tannin and tannin keeps the leaf from breaking down.   If you shred your leaves, they will decompose just fine.   Much to my husbands dismay, I am a proud leaf rustler.  I try to keep the back of my car empty so that I can pick up any bagged leaves that have been left at the curb.   You just can't have too many shredded leaves.
  • Water only as needed.   Much of the landscape will be dormant and will not be using much water.   But dry cold fronts, high winds, and low humidity can dry your plants quickly so check them regularly.   Water an established lawn only every 10 days or two weeks.    
  • Be prepared to protect your tender vegetation from any freezing temperatures that we may get. Go here to read more about this. 

PLANT: 
  • Trees and Shrubs:   All trees, including fruit, with the exception of citrus.   This is also a good time to plant non-tropical shrubs.  
  • Vegetables:  broccoli, cabbage, carrots, cauliflower, Swiss chard, collards, kale, leaf lettuce, leeks, onion (plants, not seeds), parsley, potato, radish, spinach, and turnips.  
  • Herbs:  basil, dill, fennel, mint (in a pot to contain the roots), rosemary, rue, thyme.   A frost will harm  your basil so it is best in a pot which can be brought in during inclement weather.  
  • Flowers from Seed or Bulbs:  alyssum, amaryllis bulbs, calendulas, calla lillies, petunia, larkspur, poppy, stock, calendulas.     Some say you can still plant bluebonnets and nasturtium seed but, in my experience, those are best planted in October.
  • Flowers from Transplants:   pansies, petunias, alyssum, dianthus, snapdragons, and violets
  • Rose bushes
Vegetable Planting Date Sources:  Texas Extension Service and the Old Farmers Almanac 

FERTILIZE:   Citrus trees that are at least 3 years old, your annuals and vegetables.  Do not fertilize tropicals right now; let them rest. 

PRUNE: 
  • Landscape trees.  Most established landscape trees will require a certified arborist to properly and safely prune. 
  • Peaches, figs, and other fruit trees.  I prune to remove dead wood, to shape the tree. and to keep it a size where I can reach the fruit.   We are going to plant a mango and an avocado tree and I am going to try to prune them shorter so their fruit is accessible.   I never wanted to grow them before because they get so tall, I felt like I'd be growing the fruit for the possoms, racoons, and other vermin.   
  • Do not prune your shrubs yet.   Some of our worst cold snaps (and ice storms) have arrived in February.     

Gardening adds years to your life and life to your years.         


Sunday, November 20, 2016

It's Bone Broth Season!

Nothing has improved my cooking more than using homemade bonebroth in my recipes.   I started making this a couple of winters ago because it was supposed to be good for me . . .  and because it was so warm and yummy to sip a cup of it on a cold winter evening!   I was a little slow to click in to what that rich flavor could add to my recipes.    I like to make mine in a crockpot and cook it for 24 hours or more.   The actual recipe varies from time to time, depending on what I happen to have in the refrigerator.   Here is my basic recipe:

Start with the bones from a roasted chicken - or if it's Thanksgiving week, the bones from your Thanksgiving turkey.   I try to buy chickens that are labeled hormone and antibiotic-free but I am not above buying a grilled or roasted chicken at the grocery store and then using those bones.   Add celery stalks (or the ends of celery stalks and use the celery in your dishes), 1/2 to 1 onion (quartered), two or three carrots, a bunch of parsley, and a couple of bay leaves.   Toss in some whole peppercorns and cover with water.   I use filtered water.   Now turn your crockpot on and set the timer for 24 hours.   I've read it takes this long for the marrow from the bones to leach into your broth.

The first winter that I made bonebroth, I did it on the stovetop.  I had to constantly add water to the pot and was afraid to keep the burner on over night.   I cook with gas and running the burners for 24 hours to make broth ran through LOTS of propane - and turned out to be very expensive broth!   That's when I switched to the crockpot and I love this process.   It cooks slowly enough (even on the high setting) that I don't have to add extra water.  This gives me a nice, richly colored broth.

This is what the chicken and veggies look like after a day of simmering.    Remove them from the crockpot with a big straining spoon.    You won't be able to get ALL of the solids - at least I am not patient enough to get all of the solids out during this step.   At this point, I may add some more spices.   It really depends on what my plan for the broth is.  If I'm cooking with it, I don't bother with more spices.  But if the broth is for sipping, it probably needs some salt and pepper - and a little tumeric or cumin can be tasty too. 
Let the broth cool for 30 minutes or so and then it's time to strain it.   My system is above.    Look at that color!   I made this with a couple of turkey necks and a part of a chicken carcass.    I only had part of a chicken carcass because still haven't trained all my family (i.e. my husband) not to through away chicken bones that are in the refrigerator . . . . 

I know you saw the broth in the last picture, but it was so pretty I thought I'd show you another picture of it!
The final step is to put it into jars.   It usually makes about four quarts.   I just drink what doesn't fit into the jars.   It will stay fresh in the refrigerator for 1 week or in the freezer for 3-6 months.    You can freeze it flat in plastic ziplock bags or in a jar.   For the freezing, I like the bags but for the defrosting and using, I like the jars.    If you freeze in a jar, freeze it first without the lid, leaving room for expansion.   After being frozen for a day, you can cap the jars.   Otherwise, you are risking some broken jars.

Here's a printable version of my recipe.

If you haven't tried bone broth, I hope  you will.   It's super easy, super tasty, and super good for you!

Monday, June 20, 2016

Benefits of Being a Lazy Gardener

I've be feeling a bit guilty about letting our edible garden go to seed and weed.   About 10 days ago, I noticed that anywhere from 25 - 50 Great Southern White butterflies have taken up residence in the garden.   The only flowers out there are artichoke (yep, I never bothered to harvest the chokes) and rosemary, so I don't have any idea what they are feeding (nectaring) on . . . .      Every night, most of them, including the one pictured on the right,  bed down in a large planting of canna lilies.  

I did  read that cruciferous vegetables are host plants for this butterfly.   But most cruciferous vegetables are a winter crop in my Southern garden.   The pretty little butterflies seem pretty indiscriminate about which plants they hang out near and light on -  the artichoke, asparagus, bolting kale, fennel, along with grass weeds that have gone to seed  . . .   My fear of removing what has attracted them led me to not pull or trim one single horrible looking plant.   This afternoon, when I went out to cut a kale leaf for a smoothie, the kale was covered in caterpillars!  

A quick google search verified that these are indeed Southern Great White butterfly larvae!    If you want to see the entire life cycle, visit this post by the Dauphins, a couple of butterfly experts in south Texas.   They captured every detail in some fabulous photos!   The chrysalis isn't as pretty as some, but I will be on the search for them in a day or two.  

If your schedule - or the Texas heat - keeps you from keeping your garden as tidy as you'd like, don't despair.   You may get to play host to some lovely little creatures, too!  

Sunday, May 25, 2014

Garden of Eatin'

The other day I was visiting with a fellow gardener.   She is new to edible plants and mentioned that she had tried tomatoes the past few years with no success.   I must have been in lala-land because I failed to remember that we struggled with our tomatoes the past few years - I think my tomato failure was largely due to my extreme lack of attention BUT word has it that much of the tomato sets on the market the past few years came out of the greenhouses carrying a virus.  
This is what we picked this morning.  You can see that our tomatoes are doing well.     I always try to pick them when they are just beginning to color.   Otherwise, the mockingbirds get more of the crop than we do.   They like to sit on the pasture fence and wait for them to be juicy and tasty.     Tomatoes can finish ripening on the kitchen counter and still taste vine-ripened. 

There  are a few things you can do to increase your success with tomatoes.  

Don't plant in the same place two years in a row.    This lessens the chance of disease. 

Plant a number of different varieties.  If one does poorly, another may pick up the slack.   Different varieties will also ripen at different times so you'll have a steadier supply.   

Support your tomatoes with a cage or by staking them.    This keeps the fruit off the ground and helps the plant dry faster.

Do not sprinkle tomato plants; water the ground (i.e. the root zone). 

This is the first time that I am paying attention to companion planting suggestions.   Tomatoes can be planted with peppers, basil, parsley, and marigolds.   They should NOT be planted near dill.  Dill will pop up around the garden so remove it when it sprouts near the tomatoes.  

Gardening is cheaper than therapy - and you get tomatoes!   Author unknown 


Saturday, October 13, 2012

October in the Garden

October finds south Texas in the middle of its second growing season.  It's a great month for planting!

If you are planting spring wildflower seed, you will want to get it into the ground before November 15th.   A bluebonnets hard seed coating breaks down slowly with rain and heat.   When purchasing bluebonnet seed, look for “scarified” or treated seed to ensure quick germination.  Bluebonnet seed germinates in the fall, grows a rosette of leaves and lots of roots during the winter, and blooms in the spring.  Natural rainfall is usually sufficient to grow wildflowers.    Nastursiums should be treated much like bluebonnets.  I never could grow this lovely bright annual until a friend told me to plant it by Halloween.  Like magic, we had an abundance of nastursiums the following spring.   Both the leaves and flowers are edible.   The leaves have a peppery flavor and are a good substitute for watercress.   Use them on sandwiches or in salads.  

Back to gardening . . . .   Divide your spring-blooming perennials (Shasta daisy, daylily, amaryllis and iris). When clumps grow thick and don’t bloom well, it’s time to divide them – about every 2 to 4 years. Large clumps can be divided with a shovel. Add organic matter and compost to the planting bed before replanting your newly divided perennials. 

Your shrubs will benefit from a light pruning and fertilizing right now.   In particular all lantanas are probably pretty overgrown and leggy.   Mine were covered with mealy bugs so I trimmed them WAY back to remove the pest - probably overdid it a bit, but at least I don't have to mess with the mealybugs . . . .
Cold weather crops can still be added to your planting beds:  broccoli, brussel sprouts, carrots, cauliflowers, eggplant, lettuce, onions, and spinach are some staples in our winter vegetable garden.  Carrots are the only thing I'll plant with seed -  Tomatoes aren't considered a cool season crop, but we should have enough warm days ahead that we've added some new plants.  We've also kept three tomatoes and a couple of bell peppers from the spring garden and have pruned them back.   We'll see how they do. 

Pick your vegetables and flowers to keep the plants producing. Likewise, trim your herbs will keep them growing. Encourage leaf growth by removing the flowers. Plants won’t use as much water during cooler months so reduce your watering.

The fall is the best time to plant trees.  We've FINALLY planted a lime tree this morning and have spots picked out for six new live oaks to line the back of our yard. 

Don't you love Fall?   Get out there and grow something!


Friday, July 20, 2012

Garden Crossroads

I find myself at a gardening crossroads concerning our vegetable garden.    Twelve years ago, we chose this sunny spot for herbs and vegetables.   Hubby brought in some nice light soil.     A few years later we lined it with some old, old, OLD  railroad ties and then subdivided the beds with some large salvaged square posts.    Those bed dividers also serve as paths and work spaces.   We can reach any part of the planting beds from one of these paths.   This all worked fairly well until the wood began to rot.   Now there are spots where I really don't want my grandchildren - or my mother - strolling.

This is what the garden looked like at the beginning of this spring growing season. 
You can see that land just outside one edge slopes down to the pastures.   The two closest beds contain herbs and the farthest bed houses the asparagus.  I think we planted the asparagus in 04 or 05 and are now getting a pretty steady supply of spears.   The compost bins are housed in another bed behind a small trellis.   There is a keyhole garden directly behind the bench.

  As much as I love growing herbs and vegetables, I have found that I work really hard getting things planted and then forget (i.e. ignore) this edible garden.   Which leads me to my big dilema - what direction do I want to take here?  
  • This fall, we will be installing live oak trees along the pasture fenceline -  should we extend the shade tree planting and make this a nice shady space?
  • Simple rectangular raised beds?  
  • Something a little more naturalistic.  I was reading another gardening blog, Hoe & Shovel, and her edible garden is as beautiful as the rest of the landscape.   We have been ammending this soil for the past twelve years - I hate to waste all that effort on sod . . .
Thankfully, it's just to darn hot right now to take on any big projects - so, I'll just mull this over a bit longer.  Guess I need to begin a pros and cons list of the options. . . .


Monday, June 18, 2012

June in the Garden


It is so hot outside, it's hard to think about many garden projects.  But I've been ignoring my planting beds and I can already see that I'm really going to pay for the neglect.   My plants may be melting in our heat but the weeds are thriving! 
To help your lawn withstand our summer heat, do not mow it too short: 2” for Bermuda grass and 4” for San Augustine varieties.  Never cut more than one-third of the blade.   Do not bag your grass clippings.  Clippings should be left on the lawn to work their way back into the soil.  They contain nutrients that will produce a beautiful, green lawn.   A lawn needs about one inch of water each week.  It is best for your grass to receive the inch in just one or two waterings.  If you see some brown patched in your lawn, give the grass a good tug.  If it pulls up you may have grubs eating the grass roots.   Me, I like to squish them, but your nursery professional can guide you in their treatment.   
Frangipani - loves the heat and is propogated from stem cuttings

Afternoon shade may help tomato plants continue to produce.  Varieties with large fruits tend to split in high temperatures.   Squash and beans are probably done producing.  Remove your spent vegetable crops.   Most can be added to your compost pile or bin.  Avoid putting in anything that is diseased.  If you have beds that are empty, you can spread heavy plastic sheets.  The heat generated will kill weed seeds and make gardening next fall much more enjoyable.  For the best results, be sure to leave the sheeting on for 4 to 6 weeks.  If you don’t have weed issues, add one or two inches of organic material to your planting beds. 
Bougainvillea - another heat lover
I'm seeing aphids on our crotons and jatropha.   Coleus, copper plants, and firebush also ten to be susceptible to whitefly and aphid invasions. Regularly check for whitefly and aphids.  My first treatment for aphis is to simply spray the plant and physically remove the aphids.  Spray daily for about a week and they may just give up.   Next step is to spray with soapy water (or insecticidal soap).  The soap will suffocate the insect.  Make sure to spray under the leaves, where bugs love to hide. 

To encourage compact bushes with many blooms, pinch your poinsettias and chrysanthemums every four leaves. 
Even though it is hot, you can take cuttings from spring blooming shrubs right now.  Last week I took lots of cuttings from my father's gardenia.  Cut past the green wood, just below a node.  Remove all but the last set of leaves.  I'm trying to root some of them in water and some in potting mix.  I've got mine inside where they get some indirect light.   Hopefully, I'll have little gardenia shrubs to share in a few months. 


IF YOU ARE A DIE-HARD AND MUST PLANT RIGHT NOW, PLANT:

Flowers:  ruellia, gerbera daisy, dusty miller, gazania, vinca, night and day purslane, iceplant, snapdragon, zinnia, moss rose, coleus, celosia.

Bulbs:  caladium (in the shade)

Vegetables:   Peppers (from bedding plants - it's probably too hot for many seeds to sprout)

Herbs:       mint, rosemary, rue, oregano, hierba buena.   Mints are aggressive growers. If you want to keep it contained, considered planting it in a pot. 

Trees:  This is the area to have a little patience.  Unless you don't have a choice, wait until October to plant trees.

Palms:  Palms love, love, LOVE this heat!   You can plant any of them right now.  Ones that do great in deep south Texas are: Texas sabal palm, Chinese fan palm, Mediterranean fan palm, Washingtonia fan palms, Pindo palms, Queen palms (or Cocus plumosa), and Phoenix roebellini.

Saturday, July 17, 2010

Pre-planting Planting

It is still too wet to work any soil - in fact, I would probably do more harm than good if I tried to do anything in my weed-filled vegetable beds.  BUT that doesn't keep us from "pre-planting" some seeds.    With the assistance of a very meticulous three year old, we got alot done.
Some items we chose to plant, will benefit from the additional time - cauliflower, eggplant, tomatoes, broccoli, and I'm trying some artichokes this year.  Others went into the seed trays because that what my helper wanted to plant - marigolds and a wild flower mix.    We usually sow those directly into the ground but  the landscape beds are all heavily mulched, and that makes sowing seed a little trickier. 

I know I don't need to say this but the most important thing to do after planting in seed trays is to water daily until the seed sprouts.  Give the trays a light sprinkling.  There is such a small amount of potting mix in each cell that they dry out quickly.   The wind is also drying so look for a protected spot for your seedlings.   I'm lucky - we're able to keep them in the shadehouse at our nursery where they'll get sprinkled automatically.
We planted one morning last week.  That same afternoon, my helper was already wanting to go see her plants.   Keep your fingers crossed for good germination!

Monday, July 12, 2010

Fall Veggies

Although it's not quite mid-summer, if you live in deep south Texas, it's time to begin thinking about your Fall vegetable garden.   After many years of gardening, I've finally realized that nothing is more important than doing things in  a timely manner.   I must confess that last spring I didn't get one single vegetable seed planted.   So I sure don't want to miss getting the fall garden in!

Down here in the Valley, our freeze dates run from December 31 through February 2.   Many years, we never get down to freezing.   This gives us more planting flexibility.    Doug Welsh, in Texas Garden Almanac recommends that we purchase transplants (the larger the better) instead of seeds for our vegetable gardens.  He says it will cut a full month from the days to harvest.  

But, you can't be sure which seedlings will be available in the garden centers -  so I'm going with seed this year.   If, by chance, I come across seedlings that someone  else has  taken the time and effort to start, I can always add them later.

When to plant can be confusing, so here is my list of favorite cold weather crops, the months they can be planted (we're talking the seed - add a month on the tail end for large seedlings), and the days to harvest.

Bush Beans, August - September, 30-60
Broccoli, July - November, 60-80
Brussel sprouts, July - November,  80+
Cabbage, July - November, 80+
Carrotts,  August - November, 60-80
Cauliflower, July - October, 80+

Eggplant, August, 80+
Lettuce, August - October, 30-60
Onions, September - November,  80+
Parsley,  July - November,
Peas (green), September
Peppers, July - August, 60-80
Potatoes, September, 80+
Pumpkin, August, 80+
Spinach, September - December, 30-60
Squash (Acorn), August, 40-60
Tomato, July - August, 60-80

I glanced back in my garden journal to help choose varieties.  Some of the ones that I made positive remarks about were Salad Bowl Lettuce,   Black Seeded Simpson Lettuce, Celebrity Tomatoes, Roma Tomatoes, Longstanding Spinach, Southern Comet Broccoli, and Extra Early Blue Lake Green Beans.   What varieties do well for you? 


Saturday, February 28, 2009

Time for Planting

Late February through early March is time to plant a summer vegetable garden in the deep south Texas. We have a few carry-overs in our garden - like the tomatoes that went in last October. In spite of the neglect they received, there are some plum-sized fruits on a couple of plants. Asparagus is being harvested every other day - and hopefully we'll continue this for a couple of months. The asparagus roots were planted in March of 2006. Maintenance consists of spreading an inch or so of compost over the bed each spring, keeping the bed free of weeds, and watering.

My little assistant took over this year's planting. Here are Kentucky Wonder pole beans - after she puts the seed in she gives the dirt a nice pat to help make good contact between the seed and the dirt. She also planted mounds of squash - both yellow crookneck and zucchini. But she'll tell you they're all "blue" squash - since that was the color of the seeds.


Finally, a nice drink of water for everything in the garden. Once the seeds have sprouted, we'll "mulch" the bare dirt with hay. That'll help keep weed seeds from sprouting and tills nicely into the soil at the end of the growing season.
If you have herbs hanging on from last year, you may want to give them a nice haircut. My basils, tarragon, parsleys, and mints have responded well to heavy trimming. Cilantro is trying to go to seed - and the dill has self-seeded in all the empty garden beds. The dill can stay for a little while longer - just until we're ready to plant the black-eyed peas and okra.
This is the first year that we made enough compost for a generous application in all the vegetable beds! I hope you're composting, too!

Tuesday, January 29, 2008

Gardening is just yummy!


Homegrown broccoli is so tender that it's just about as good raw as it is steamed. The first time I grew broccoli, the plants went into my compost pile shortly after the main stalk was harvested. I had no idea broccoli would continue producing smaller spears around the edges of the plant. That same winter, my dad ate from his broccoli plants for months! Live and learn.


We're keeping a close watch on this little beauty! Three of my six cauliflower plants have fruits that have turned purplish and whose florets are not full. Why does that happen?


This year's seeds are now in the garden centers so it's time to begin planning the spring veggie garden. I grow vegetables, herbs, and a few cut flowers in raised beds. The most important part of my plan will be finding the right bed for the tomatoes and peppers. Rotating their planting location will reduce any disease they might get. I also always look for disease resistant varieties. (that info is listed on the plant label). If you can keep your plants disease free, your family will be munchin' on home grown tomatoes until August. My fave tomato for the Rio Grande Valley is Celebrity. It has been a good producer year after year. Even if you don't have a "vegetable garden", tuck a tomato plant into one of your sunny beds. Your taste buds will thank you for it!

I hope that you all have a chance to grow a vegetable or two!